

 Bob Scott
Table of Contents
- Why Mounting Tackle Clips on Your Boat Matters
- Choosing the Right Mounting Location for Clip Strips
- Preparing Your Mounting Surface
- Selecting Adhesive or Screw Fasteners
- Installing Tackle Clips Step by Step
- How to Organize Soft Plastics on a Boat
- Crankbait Storage for Bass Boats
- Boat Storage Compartment Organization
- Frequently Asked Questions
Last Updated: October 21, 2026
Why Mounting Tackle Clips on Your Boat Matters
Using mount tackle clips boat systems transforms how you fish.
Tournament anglers know every second counts. When soft plastics, crankbaits, and spinnerbaits are scattered across compartments or stuffed in bags, you waste minutes searching instead of casting. Easy View Tackle’s patent-designed clip strips and foam-filled hangers keep gear visible and accessible right where you need it.
Properly mounted tackle clips also protect your lures: finishes don’t get scratched, and gear stays put in rough water.
The installation is straightforward, and the same core principles apply whether you mount tackle clips in boat compartments, under lids, or along the sides.
Choosing the Right Mounting Location for Clip Strips
Your mounting location determines how quickly you can access your tackle and how well it stays organized.
Evaluating boat storage compartments
Boat storage compartments are ideal for mounting tackle clip strips: they protect gear while keeping everything within arm’s reach.
Before choosing a compartment, measure the available wall space. Easy View Tackle’s clip strips come in different configurations, so mark off mounting areas leaving clearance for lids to open and close.
Under-lid boat tackle storage options
Mounting clips under boat lids gives you hidden storage that maximizes space. Boat lids often have flat interior surfaces perfect for adhesive or screw mounting.
Under-lid mounting works especially well for soft plastics and smaller crankbaits: opening the lid reveals your entire selection.
Preparing Your Mounting Surface
A clean, properly prepared surface determines whether your clips stay secure in rough water or come loose over time.
Clean the area with rubbing alcohol to remove dirt, salt spray residue, and oily film, then wipe it completely dry.
For screw mounting, mark each hole location and double-check spacing and alignment before drilling.
Selecting Adhesive or Screw Fasteners
Easy View Tackle’s system mounts with either adhesive or screw hardware. The right choice depends on the mounting surface material, whether it’s structural or a thin cosmetic panel, and whether you want the installation permanent or removable. Getting this right up front keeps clips holding through chop, trailer vibration.
Match the method to the boat surface
Adhesive mounting: when it wins and how to make it hold
Adhesive mounting gives you a clean, fastener-free look and is the better choice for thin liners, gelcoated under-lid surfaces, and any spot where you don’t want a hole in the boat.
Wipe with rubbing alcohol on the bonding surface and the back of the mounting pad then let it dry completely. Apply adhesive per the product instructions to the pad surface, press firmly, and hold for a few minutes.
Screw mounting: hardware, backing plates, and corrosion
Screw mounting is removable and is the right call for plastic compartments, thicker fiberglass, and anywhere you expect to reorganize later. The hardware matters as much as the method:
- Use stainless steel fasteners. Marine-grade stainless resists rust and keeps its appearance over years. The system comes with the screws needed.
Choosing between the two
If the surface is smooth, flat, structural, and you don’t plan to move the clips, adhesive gives you the cleanest install with no holes to seal. If the surface is plastic, thin, curved, or you want to reposition later, screw mounting with stainless hardware, washers, and sealant is more durable. Either way, the clip strip or foam hanger should sit flush with no gaps, a gap is where water and vibration get in.
Installing Tackle Clips Step by Step
The installation follows the same sequence whether you’re using adhesive or screws, but the details change with the surface. Work through these steps in order and your clips will hold through chop, trailer vibration, and repeated use.
Step 1: Dry-fit and mark
Hold the Easy View Tackle clip strip or foam hanger where it will live and check that it sits level and square with the boat’s lines, a crooked strip makes baits hang at an angle.
Mark each fastener location with a pencil or marker. Double-check spacing and alignment before you drill, a misplaced hole is permanent.
Step 2: Confirm what’s behind the surface
Before any drill bit touches the boat, verify there’s nothing behind the panel. Wiring, fuel lines, livewell plumbing, and hydraulic hoses run through console bases, gunwales, and compartment walls on most bass boats. If you can’t see behind the panel, probe with a thin wire or use a stud finder rated for the material.
Step 3: Drill pilot holes
Use a bit slightly smaller than your screw diameter. A pilot hole prevents gelcoat from cracking, keeps aluminum from distorting, and stops plastic from splitting.
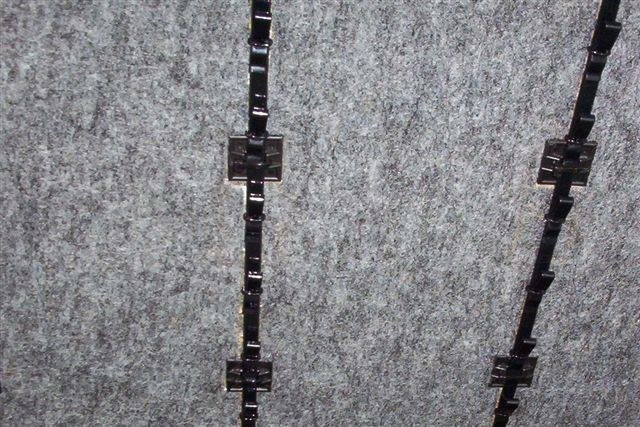
20210114 111438237 I O S ADHESIVE MOUNT
Step 5: Secure the clips
For adhesive mounting, apply the adhesive supply with the kit to the product per instructions, press firmly, and hold for the specified time. Wipe excess immediately and let the bond cure fully, often overnight, before installing clip strips.
Step 6: Test retention before you load up
Don’t trust a fresh install until you’ve tested it. A simple sequence catches almost every problem:
- Static tug test. Pull each clip firmly by hand in the direction the load will pull. It should not move, flex, or creak. A loose screw gets tightened; a moving adhesive clip gets removed and remounted.
- Loaded test. Hang your heaviest intended baits, a big crankbait or a loaded soft-plastic strip, and leave them overnight. Check for any sag, gap, or movement the next morning.
- Vibration test. Take the boat out on a normal run, including some chop if conditions allow, then inspect every clip. Look for backing-out screws, cracked gelcoat around holes, and adhesive edges lifting.
- Rough-water check. After your first rough-water day, re-check fasteners and adhesive joints. Re-tighten screws that have loosened and reseat any clip strip that has not compleatly cured.
Step 7: Load and organize
Once the installation passes testing, load your baits. Keep the heaviest lures on the most heavily backed clips and leave space between baits so they hang free and dry. Re-check the installation after the first few trips, a five-minute inspection now prevents a compartment full of loose tackle later.
How to Organize Soft Plastics on a Boat
Soft plastics need quick access and protection.
Organize soft plastics to your style of fishing.
Hang soft plastics vertically in compartments. The clips grip soft plastic bags by opening the clip jaw and line the bags hanging hole up with the clip jaw then insert the hanging hole through the clip jaw and capture the zipper into the clip jaw.
Crankbait Storage for Bass Boats
Crankbaits deserve dedicated storage because they’re expensive and easily damaged.
Mount foam hangers in areas with good visibility so you can see your entire crankbait selection at a glance.
Hang crankbaits by their hook pressed into the foam hangers. This protects hook points and keeps the bait dry.
Organize crankbaits by diving depth, color, or size depending on your fishing style.
Boat Storage Compartment Organization
Easy View Tackle’s patent-designed clip strips and foam-filled hangers transform your boat storage into a professional fishing platform, keeping your soft plastics, crankbaits, and spinnerbaits visible, accessible, and protected in rough water.
Get started with Easy View Tackle and spend less time hunting for gear and more time fishing.
Frequently Asked Questions
Where should you mount tackle clips on a boat?
Mount tackle clips inside accessible boat storage compartments, under lids, or along interior walls where you can grab lures quick. Under-lid storage works well for frequently used tackle, while compartment-mounted clips keep specialty lures organized and visible.
Should you use adhesive or screws to mount tackle clips on a boat?
The right choice depends on the mounting surface material. Easy View Tackle’s system mounts with either adhesive or screw hardware.
How do you organize soft plastics on a boat?
Use clip strips designed specifically for soft plastics, which hang baits vertically. Organize by fishing style so you can locate the exact lure you need in seconds. Mount clip strips under a lid where soft plastics stay visible and accessible. The Easy View Tackle system’s clip strips keep soft plastics organized, dry, and ready to grab during competition or weekend fishing trips.
Can tackle clips be mounted under a boat lid?
Yes, under-lid mounting is one of the best uses for tackle clips on boats. The underside of storage lids provides hidden, protected space that maximizes boat organization without taking up valuable compartment room. Under-lid storage keeps frequently used lures within arm’s reach while protecting them from rough conditions. This placement is especially valuable on center consoles and smaller boats where space is limited.